
Link to code : https://github.com/MeghaS94/DreamWorks-FX-C.git
First try at CG Fireworks!
Eyes!
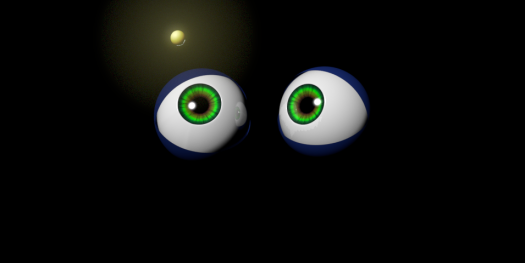
I wanted to make a pair of expressive eyes curiously following a glowing object. I havent got the best result possible yet !! A python script helps the eyes blink periodically, an aim constraint keeps the eyes focused on the ball.
Code that automates the blink every 60 seconds/frames :
def keyBlink(pObjectName, pStartTime, pEndTime, pTargetAttribute1 , pTargetAttribute2):
     #the attribute flag is the name of the animated attribute
     #cutKey removes any existing key that may have been set
     cmds.cutKey(pObjectName, time = (pStartTime, pEndTime), attribute = pTargetAttribute1)
     cmds.cutKey(pObjectName, time = (pStartTime, pEndTime), attribute = pTargetAttribute2)
     tempTime = pStartTime
     #Set values to ensure the eye does not close completely.
     esw =287    #cmds.getAttr("makeNurbSphere5.endSweep")
     ssw = 26.503#cmds.getAttr("makeNurbSphere5.startSweep")
     while(tempTime <= pEndTime) :
        #set key! attribute and its value
        #ssw , esw -> how do they change
        cmds.setKeyframe(pObjectName, time=tempTime, attribute =pTargetAttribute1, value=esw )
        cmds.setKeyframe(pObjectName, time =tempTime, attribute =pTargetAttribute2 , value=ssw)
        # every 60 seconds,
        if(tempTime %60 == 0 ):
            esw = 360
            ssw = 0
            cmds.setKeyframe(pObjectName, time=tempTime, attribute =pTargetAttribute1, value=esw )
            #if( ssw >=0) :
            cmds.setKeyframe(pObjectName, time =tempTime, attribute =pTargetAttribute2 , value=ssw)
            tempTime += 20
            esw = 320
            ssw = 20
            cmds.setKeyframe(pObjectName, time=tempTime, attribute =pTargetAttribute1, value=esw )
            #if( ssw >=0) :
            cmds.setKeyframe(pObjectName, time =tempTime, attribute =pTargetAttribute2 , value=ssw)
        else :
            esw =287.117
            ssw = 26.503
            tempTime += 1
            #print tempTime

     #how to convert curved tangents into linear on the animation graph editior
     #select the keys in a specific time range
     cmds.selectKey(pObjectName,time=(pStartTime, pEndTime), attribute =pTargetAttribute1,keyframe=True)
     cmds.selectKey(pObjectName,time=(pStartTime, pEndTime), attribute =pTargetAttribute1,keyframe=True)
     cmds.keyTangent(inTangentType ='linear' , outTangentType = 'linear')
Starting out with Maya
Python scripting in Maya
This is a recreation of the example animation shown in autodesk’s series of tutorials on python scripting in maya. This example creates a glowing sphere with randomly placed hexagons. The hexagons are constrained to point towards the sphere. An expansion attribute is added to the list of attributes of the hexagons. This is value is gradually increased/decreased to make the hexagons expand from or contract towards the glowing orb.
Code snippet that determines the functionality where hexagons expand from the center:
import maya.cmds as cmds

#One part of the code from the tutorial series.
selectionList = cmds.ls(orderedSelection = True, type = 'transform')

if len(selectionList) >= 2:
    targetName = selectionList[0]
    selectionList.remove(targetName)
    #create an empty group in which all locators are stored
    locatorGroupName = cmds.group(empty =True, name = 'expansion_locator_grp#')

    #create a custom attribute on the target called expansion
    maxExpansion = 100
    newAttributeName = 'expansion'
    #check if this attribute exists!
    if not cmds.objExists('%s.%s' %(targetName, newAttributeName)):
        #add the attribute to the target
        cmds.select(targetName)
        #keyable = true makes it appear in the attribute menu
        cmds.addAttr(longName= newAttributeName, shortName= 'exp',
                                attributeType ='double', min=0, max=maxExpansion,
                                defaultValue=maxExpansion, keyable = True)

    for objectName in selectionList:
        #obtain position of the object
        tempResult = cmds.getAttr('%s.translate' % objectName)
        #tempResult returns a list, first element contains the objects coords
        coords = tempResult[0]
        #create a locator , name is returned at index0
        locatorName = cmds.spaceLocator(position = coords, name = '%s_loc#' %(objectName))[0]
        #center the locator's pivot
        cmds.xform(locatorName, centerPivots = True)
        #add the new locator to the group
        cmds.parent(locatorName, locatorGroupName)

        #point constraint arg1->list of two points between which objects will be constrained
        pointConstraintName = cmds.pointConstraint([targetName, locatorName],objectName,
                                                   name = '%s_pointConstraint#' % (objectName))[0]

        #create an expression , string flag contains the expression
        cmds.expression(alwaysEvaluate=True, name='%s_attractWeight' % (objectName),
                      object = pointConstraintName,
                      string = '%sW0= %s-%s.%s' %(targetName, maxExpansion, targetName, newAttributeName))
        #expression has to be applied to all the point constraints
        #expansion attr is related/conencted to the point constraints locator weight
        cmds.connectAttr('%s.%s' %(targetName, newAttributeName) ,
                        '%s.%sW1' % ( pointConstraintName, locatorName   ) )

    #center the locator group's pivot!
    cmds.xform(locatorGroupName, centerPivots = True)
else :
    print 'please select atleast 2 objects'
Fun With Blender!
I started off wanting to recreate Hedwig flying over hogsmeade, on his way to deliver a letter and this is what I ended up with! One of the fun discoveries I made was how particle systems were used to get the effect of snow in the scene(I guess my render dosen’t really show the snow). I started modelling the village setting, learnt how to rig and pose the bird, thanks to youtube’s rich set of tutorials!
I played around a little with the camera angles, but finally settled for a simple follow target setting. Tried to get the effect of a moonlit street and a starry sky, with street lights on either side of the road. I stayed away from texturing for the most part :p

